Blogger Widgets

How to Add a Drop Down Menu Navigation in Blogger

     How to Add a Drop Down Menu Navigation in Blogger                 By Ansar


I stressed over this question for WEEKS! The problem is that there is no easy way to do this in Blogger. You have to write your own HTML and CSS to get it working, and for me that isn’t a problem, but trying to explain it to non-coders is REALLY difficult. And then there’s the problem of me trying to code it for multiple different blog designs.. it just isn’t easy!
Then I found a great site that suddenly made my tutorial so much easier!
But keep in mind that you will still have to edit your template CSS and HTML a lot.
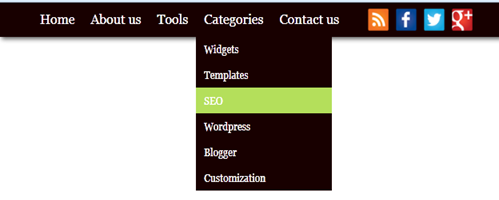
            

Step #1: Create Your Menu

First, head on over to CSS Menu Maker and create your navigation menu! Pick one of the pre-made styles they have and click “Customize”. Then you can add links to the menu, drag them around, change the titles, and insert the URLs. For each menu item you have to put in the URL of the page. You will need to copy and paste this from your Blogger site!
When you’re done, click the “Download” button.

Step #2: Adding the CSS

After hitting “Download”, you should have a .zip file on your computer. Unzip it so that you have access to the files inside. There should be a folder in there called “menu_assets” and a file called “style.css“. Open up that file in some kind of text editor (like Notepad, Notepad++, or Textwrangler). You will need to copy the code and put it on your blog. For now, leave it open in the text editor, and open up a new page to your Blogger blog.
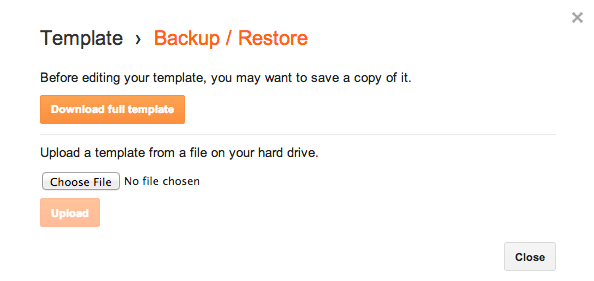
You have to click on the tab to go to “Template”. Before we do anything, you need to back up your template! Since we’re editing code it’s really important that you back it up beforehand in case you make any mistakes and need to revert them. So, in the top right corner, click on “Backup / Restore“, and then click the button to “Download full template”.
Backup Blogger Template
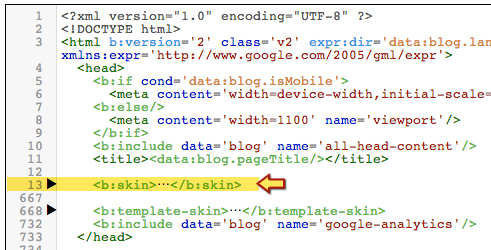
Once you have your template backed up, click on the button to “Edit HTML”. Look for the bit of code near the top that looks like this:
Editing Your Blogger Template
Click on the text that says <b:skin>…</b:skin> to expand it. Then scroll aaaaall the way down until you find the </b:skin> tag again.
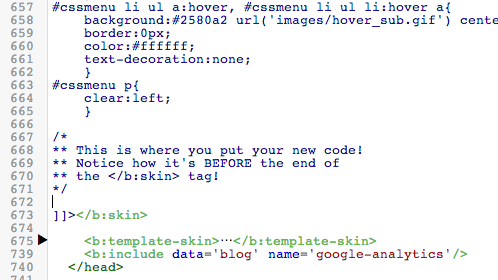
Put Blogger CSS Here
Make a new line BEFORE the </b:skin> line. This is where we’re going to put our first bit of code! So go back to your text editor with the style.cssdocument and copy everything. Then, paste it in your template on that new line we made. Then, save your template. You might want to refresh the homepage of your blog to make sure nothing is broken. Nothing should look different after adding this code! So make sure everything is working as expected.

Step #3: Adding the HTML

Next up, we have to add the HTML. Go back to the files you downloaded from CSS Menu Maker. There should be a file called instructions.html. Double click that file to open it in your web browser. Ignore all the instructions except for #3:
3. Copy and paste the html below where ever you want your menu to show up.
Copy all the text in the box below that line. This is your HTML! Now we just have to put it into Blogger…
THIS IS THE HARDEST PART OF THE TUTORIAL!!
This is literally one of the reasons why I dreaded writing this tutorial. The question is: where do we put the HTML? The answer: it depends on your template. That’s why this tutorial sucks. Even more so if you have a custom made template.. the HTML may vary. So, I’m sorry that this is so hard to explain because it seriously depends on where YOU want your navigation (above or below the header?) and what template you’re using.
On the Template page, click Edit HTML. Now you need to go digging through the template to paste the dropdown code HTML in somewhere. Yep, I’m not even joking. If you’re using a default Blogger template and want the dropdown above your header, a good place to put it is right below this line:
<div class='content-outer'>
Right below that, enter the dropdown HTML text.
Want it below your header? Here’s a good place:
</header>

<!--menu HTML goes right here-->

<div class='tabs-outer'>
Paste in the HTML where I’ve written “menu HTML goes right here”. In between the closing </header> tag and the <div class=’tabs-out’> tag.

Aaaand you’re done!

Assuming you’ve followed all the steps correctly, you should now have a working dropdown menu!
How to design free logo for website

             How to design free logo for website
              By Ansar


 Today i am going to show you how to make online logo for 

your blogger website and other website free of cost.There 

are several websites on the internet that provides tools to 

made online logo but they are not free.I am going to show 

you 7 websites that are free to create own logo in just five 

minutes.so please share this post to your friends and pray for 
our team.Lets start! 


7 free websites to create own logo

  1. Click here                                                                                       


    Check and don't forget to comment...............


How to Add a Photo to a Blogger Header

                 How to Add a Photo to a Blogger Header

                           By MuhammadAnsar


 The header is one of the first elements users notice while visiting your blog. It typically consists of text, an image or both. Blogger’s default header consists of a text message and an optional slogan you set up when you initially configure your blog. However, you can personalize your page further by adding your own photo into the mix.


 So,

        Let's Go


Step 1
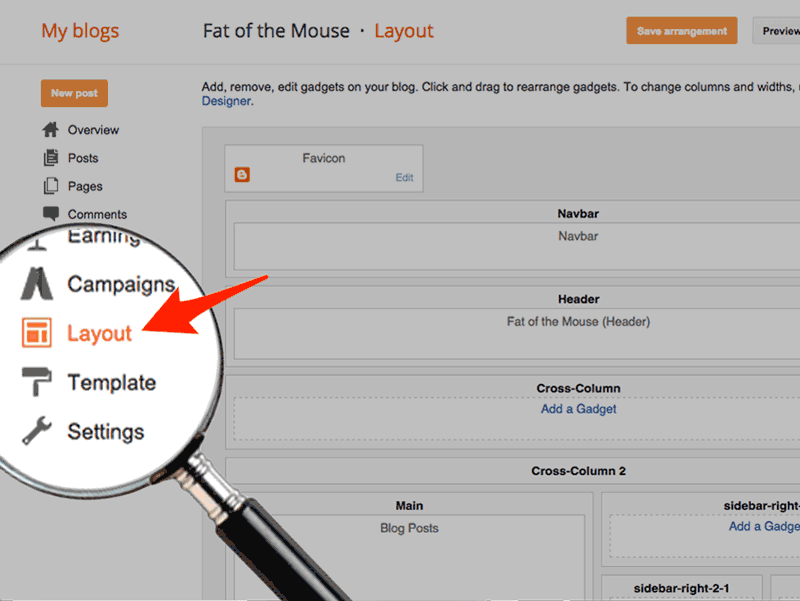
Go to Blogger.com to view your account’s dashboard. Click the drop-down arrow located to the right side of your blog’s title and select “Layout” from the context menu. If you're using Blogger’s older template, click “Design” from the blog you wish to configure.
Step 2
Click the “Edit” option within the header section, located toward the top of the screen. The header typically contains the title initially given to your blog.

Step 3
Select whether the photo should be placed behind your blog’s current title and description or whether to replace it entirely. Additionally, click the check box stating “Shrink to Fit” in the event your photo exceeds the blog’s height and width.
Step 4
Click “Browse” if you wish to upload a photo from your computer. If so, click to highlight the photo in question using the subsequent dialog menu, followed by "Open." Otherwise, click the “From the Web” button found within the header section and paste the picture's direct link. This URL is typically found in your Web browser's address bar.
Step 5
Click “Save” to effectively apply the photo as your blog’s new header.

                                                    DONE


How Do I Find My Google Plus User ID? [Google+]

   How Do I Find My Google Plus User ID? [Google+]

 http://www.tots100.co.uk/wp-content/uploads/2014/09/shutterstock_171257777-1.jpg


Since the release of Google Plus, a number of third party services and products have been released.
Many of these services require users to enter their Google+ user ID numbers to allow the application(s) to access user information such as the user’s profile picture or number of followers.
The best example I have of one of these applications, is the Google+ widget displayed on the right side of my blog
Let's start

Accessing your Google Plus user ID is simple:

  1. Log in to Google+.
  2. Click on the “profile” tab to view your own profile.
  3. Google Plus Profile Tab
  4. If you look at the URL in the address bar, it should look something like this:
    https://plus.google.com/118034332620226723540/posts
    
  5. The long numerical string in the URL is your Google+ ID. Here is mine from the URL above:
  6. 118034332620226723540

How to Add Links on Blogger to Follow Your Facebook Account

How to Add Links on Blogger to Follow Your  Facebook  

                                       Account


Google's Blogger blogging platform lets you customize your blog by adding widgets to your profile. These widgets range from calendars and other tools, to profile badges for your social networks. If you want to add a Facebook profile badge to your Blogger profile, you can do so directly through the Facebook badges website.

 Let's start

Step 1
Log in to your Facebook account.
Step 2
Go to Facebook.com/badges. Click the type of badge that you want to add to your Blogger account.
 Step 3

Click the "+ Blogger" button. Type your Blogger log-in credentials in the spaces provided and click the "Sign in" button to sign into your account.
Step 4
Type a title for the Facebook badge widget in the space provided. Click the "Add Widget" button to add the Facebook link to your Blogger page.
Step 5
Done

EPakistanNews.com

EPakistanNews.com

Link to EPakistanNews.com

Earthquake with 7.0 Scale hits Pakistan

Posted: 10 Apr 2016 04:03 AM PDT

Pakistan News, Earthquake in Pakistan : Earthquake with 7 Scale hits the Pakistan on 10th April 2016 Sunday in Islamabad, Multan, Rawalpindi, Sargodha, Faisalabad, Lahore and other areas of Punjab, E...

For More Visit http://EPakistanNews.com

A great software

                                               A great software


    To  download Click here

for windows xp 7,8,10

for windows xp 7,8,10

for windows xp 7,8,10

for windows xp 7,8,10

for windows xp 7,8,10

for windows xp 7,8,10

must check

Clock skin pack Software for pc

                           Clock skin pack Software for PC

http://img.brothersoft.com/screenshots/softimage/s/skins_pack_for_atomic_alarm_clock-182716-1.jpeg

A great software for PC.

Clock Skin Pack for PC.

Download and install Clock Skin for PC.

  1. Download software

    2. install


    3. Enjoy...........................

    Click Here

How to add Weather Widget in blog

  •  


    STEP
      1
    Blogger Weather Step 01

    Blogger Layout

    Launch the Blogger editor. 

    Click design in the upper right corner, then select layout from the sidebar.
  • STEP
    2
    Blogger Weather Step 11

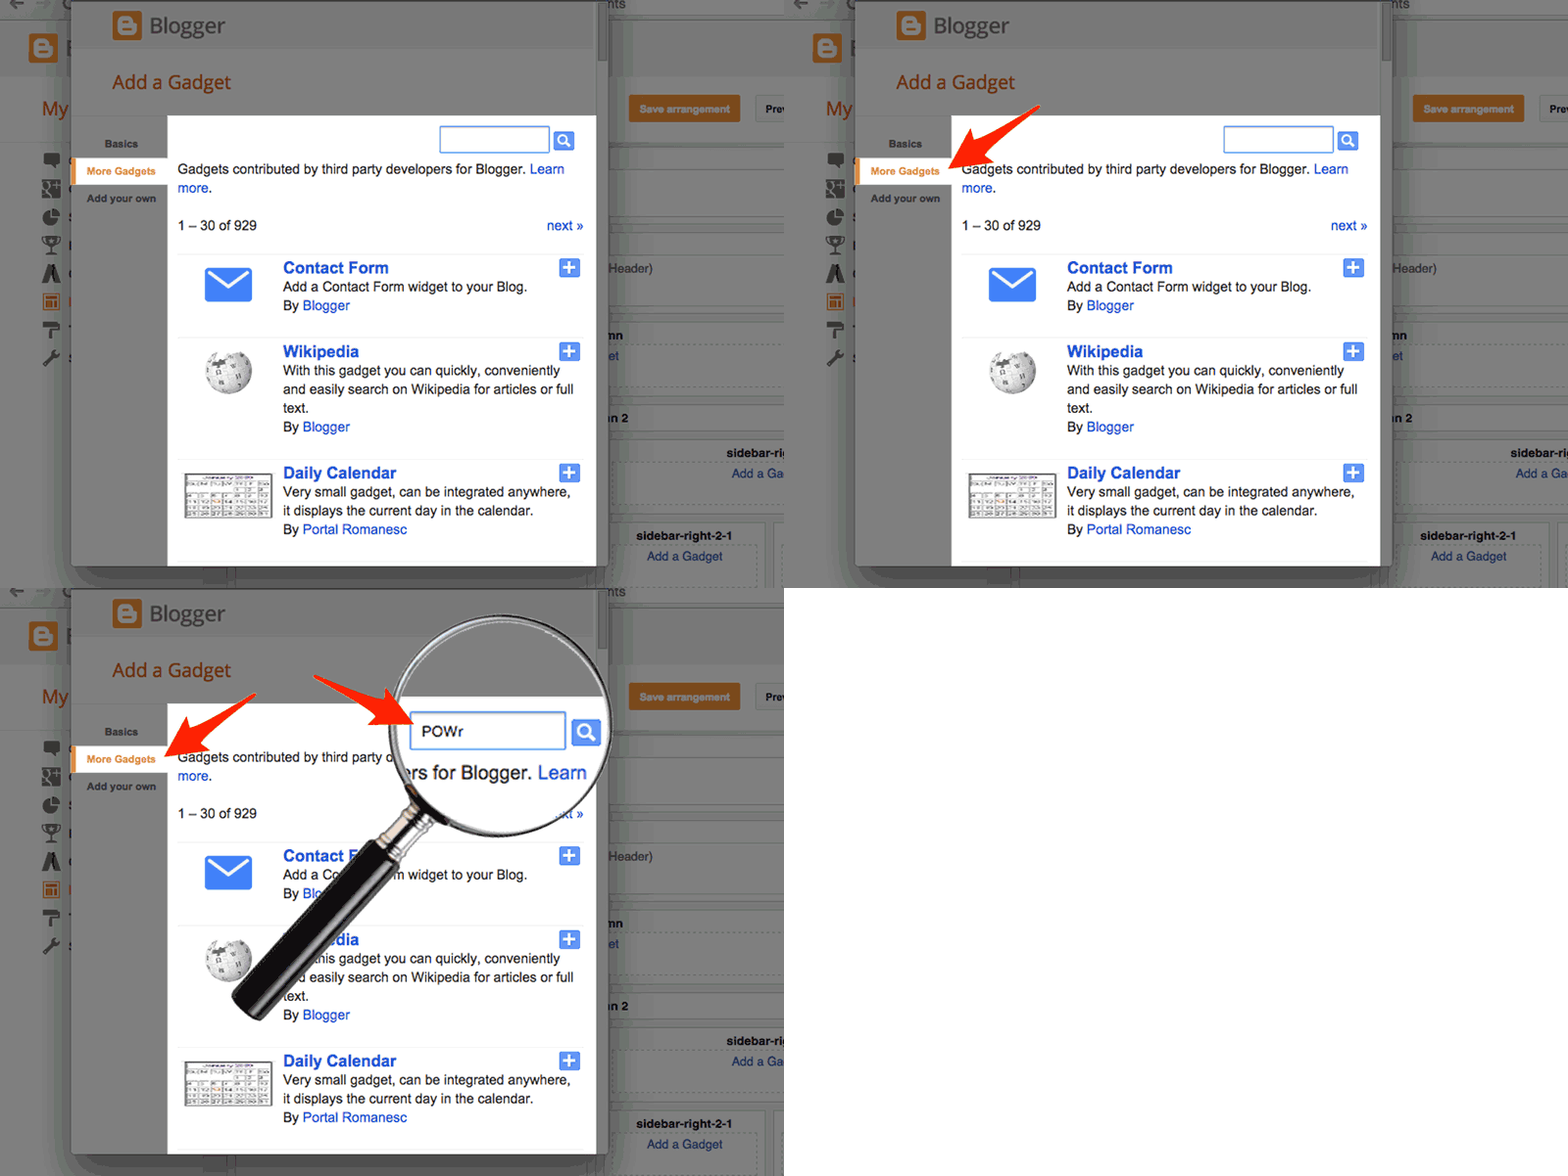
    Add a New Gadget

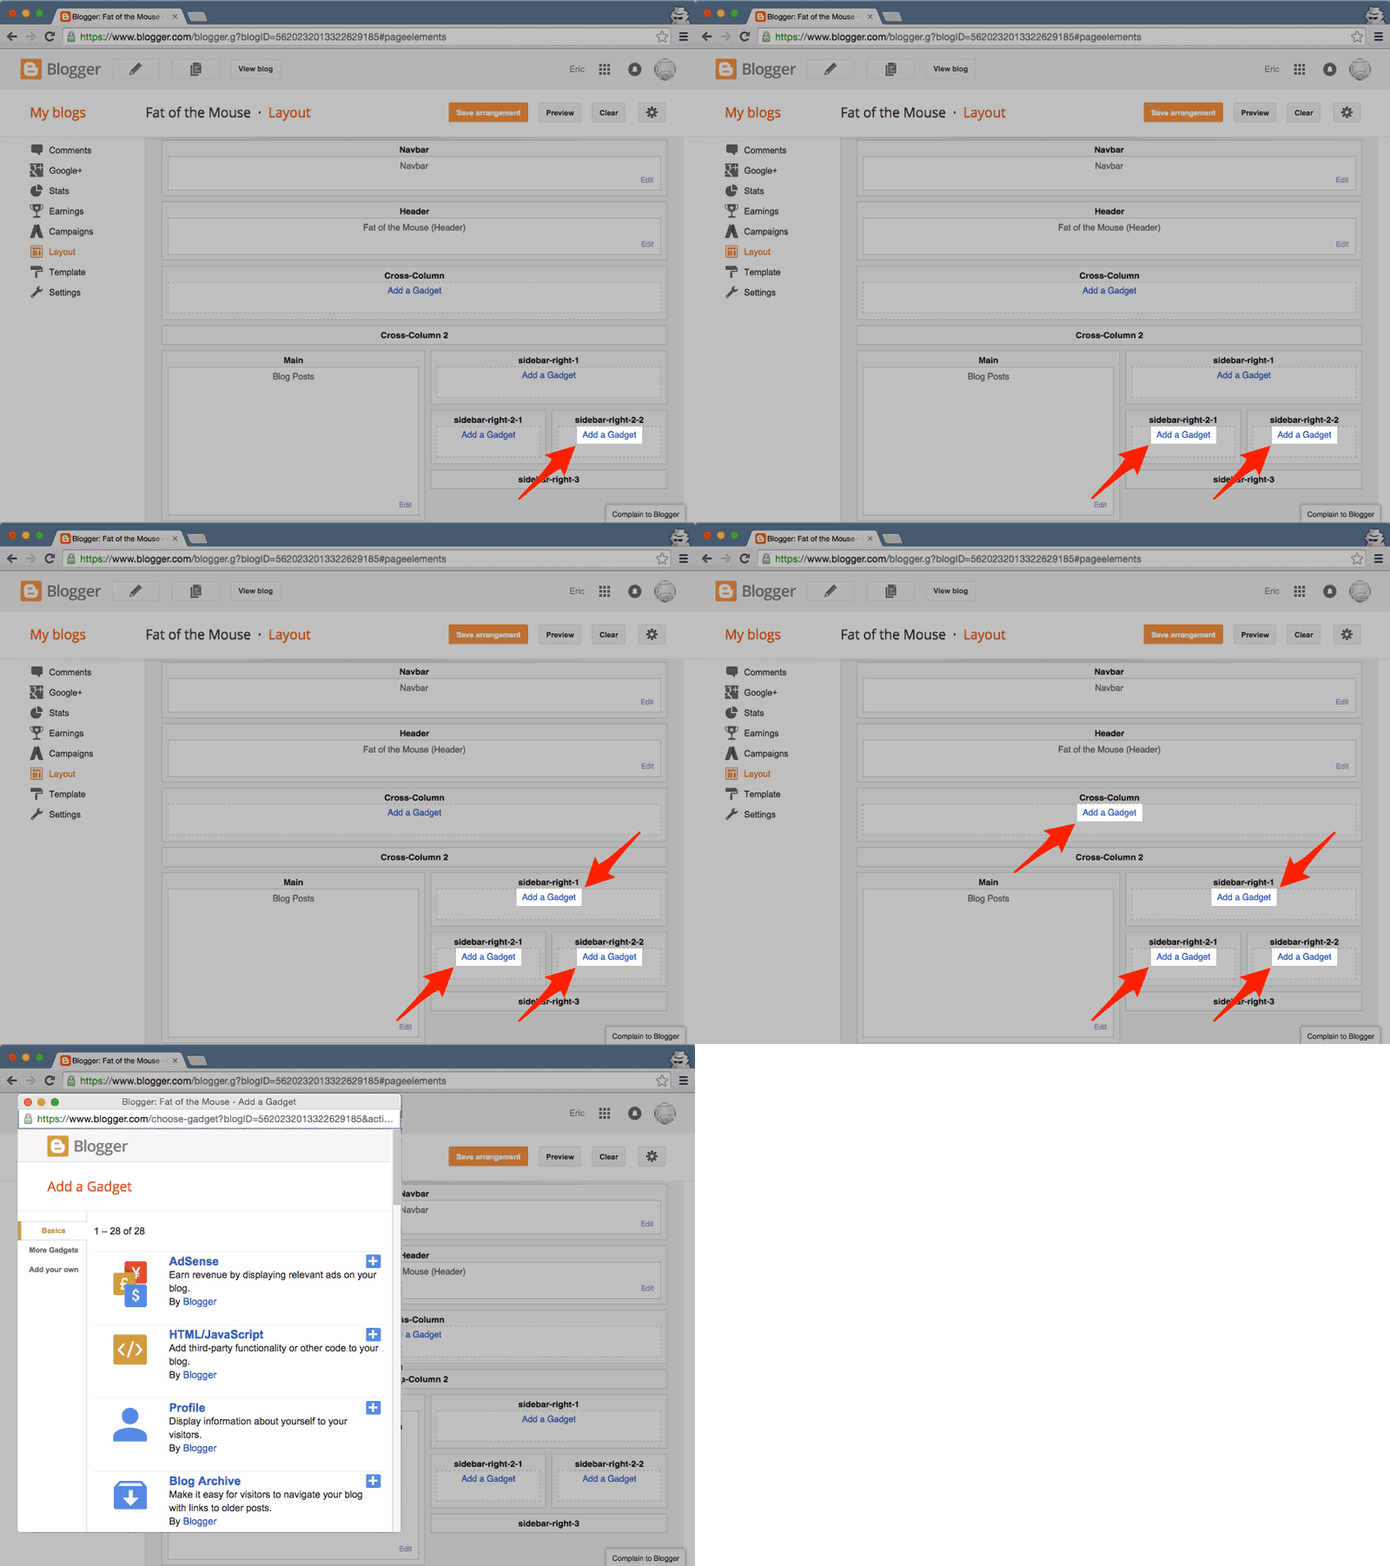
    Click on any of the Add a Gadget buttons to add POWr Weather. This will launch the Blogger Gadget pop-up.
  • STEP
    3
    Blogger Weather Step 21

    Search for POWr

    Open the More Gadgets menu and search forPOWr.
  • STEP
    4
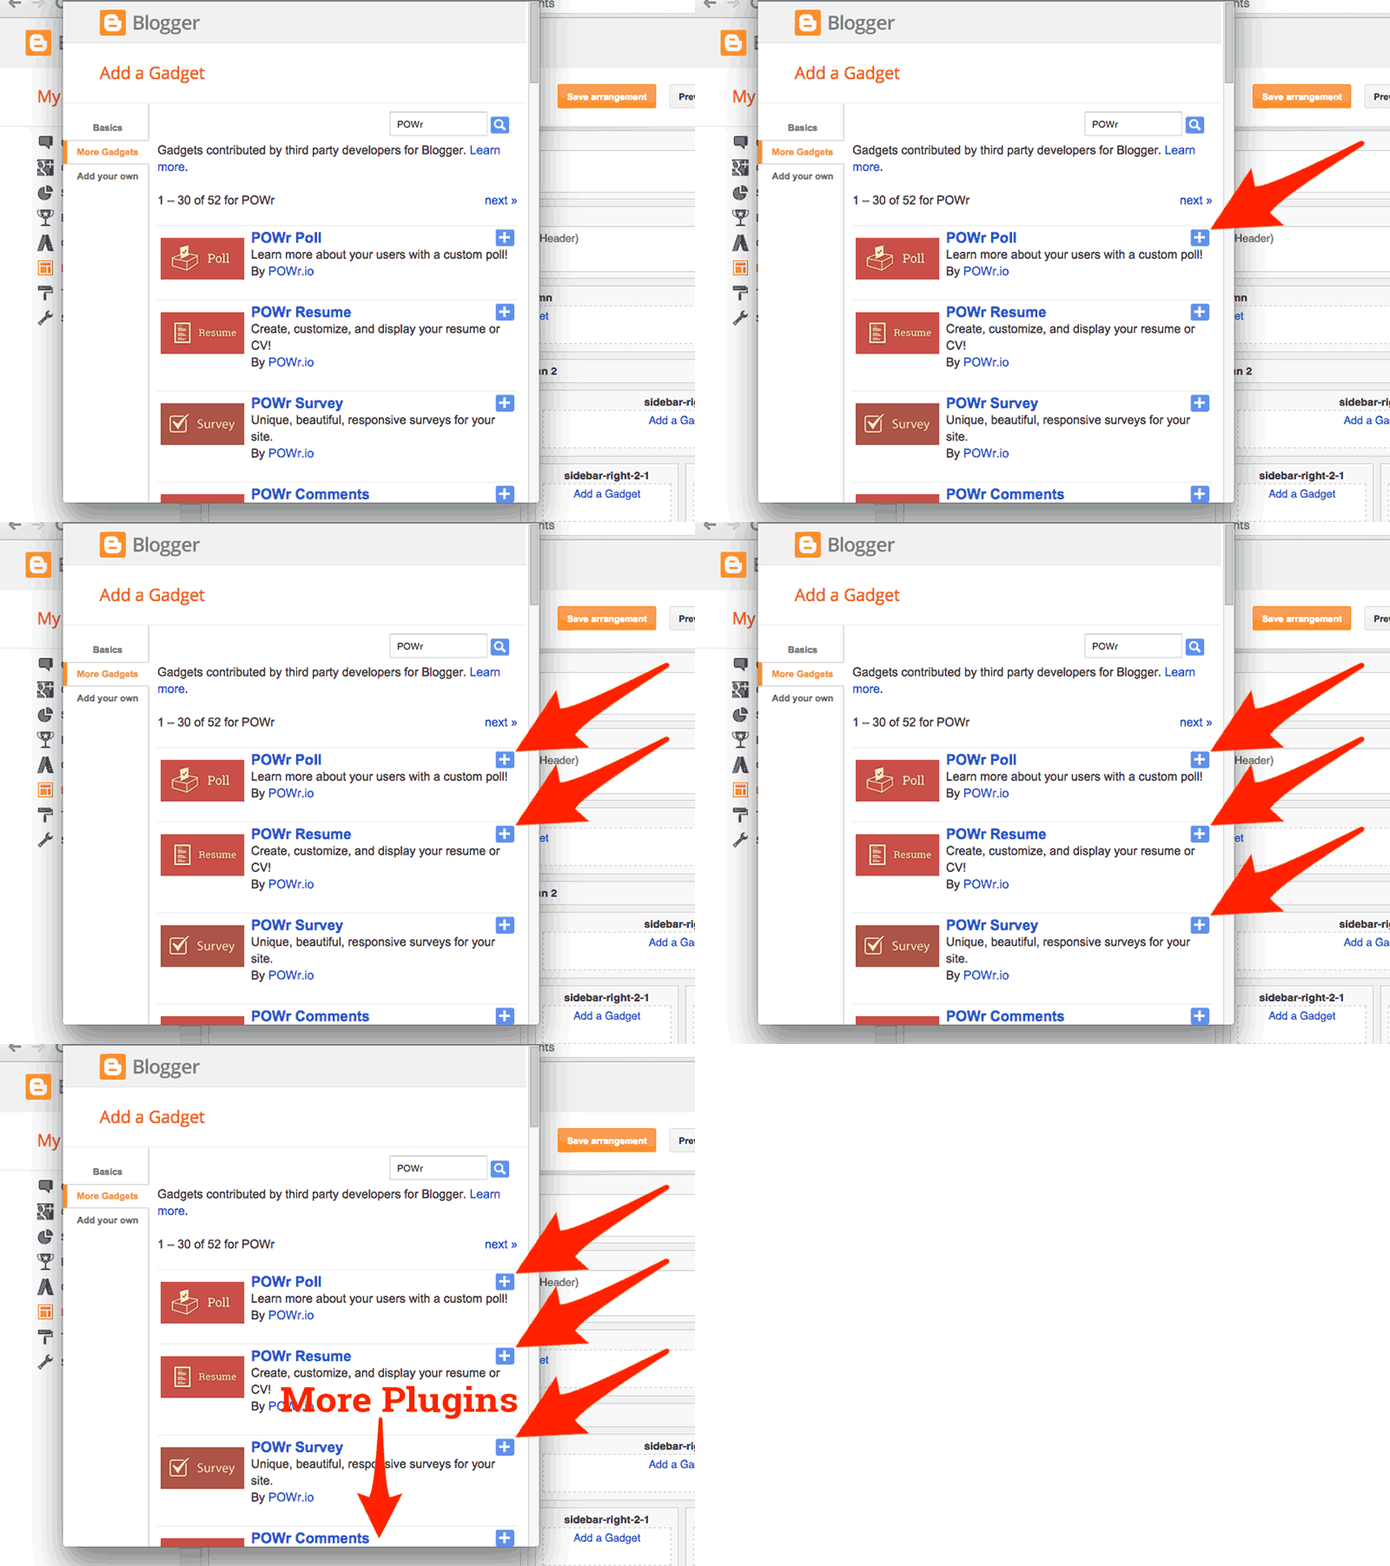
    Blogger Weather Step 31

    Add Weather Gadget

    Find POWr Weather in the list and add it to your site.
  • STEP
    5
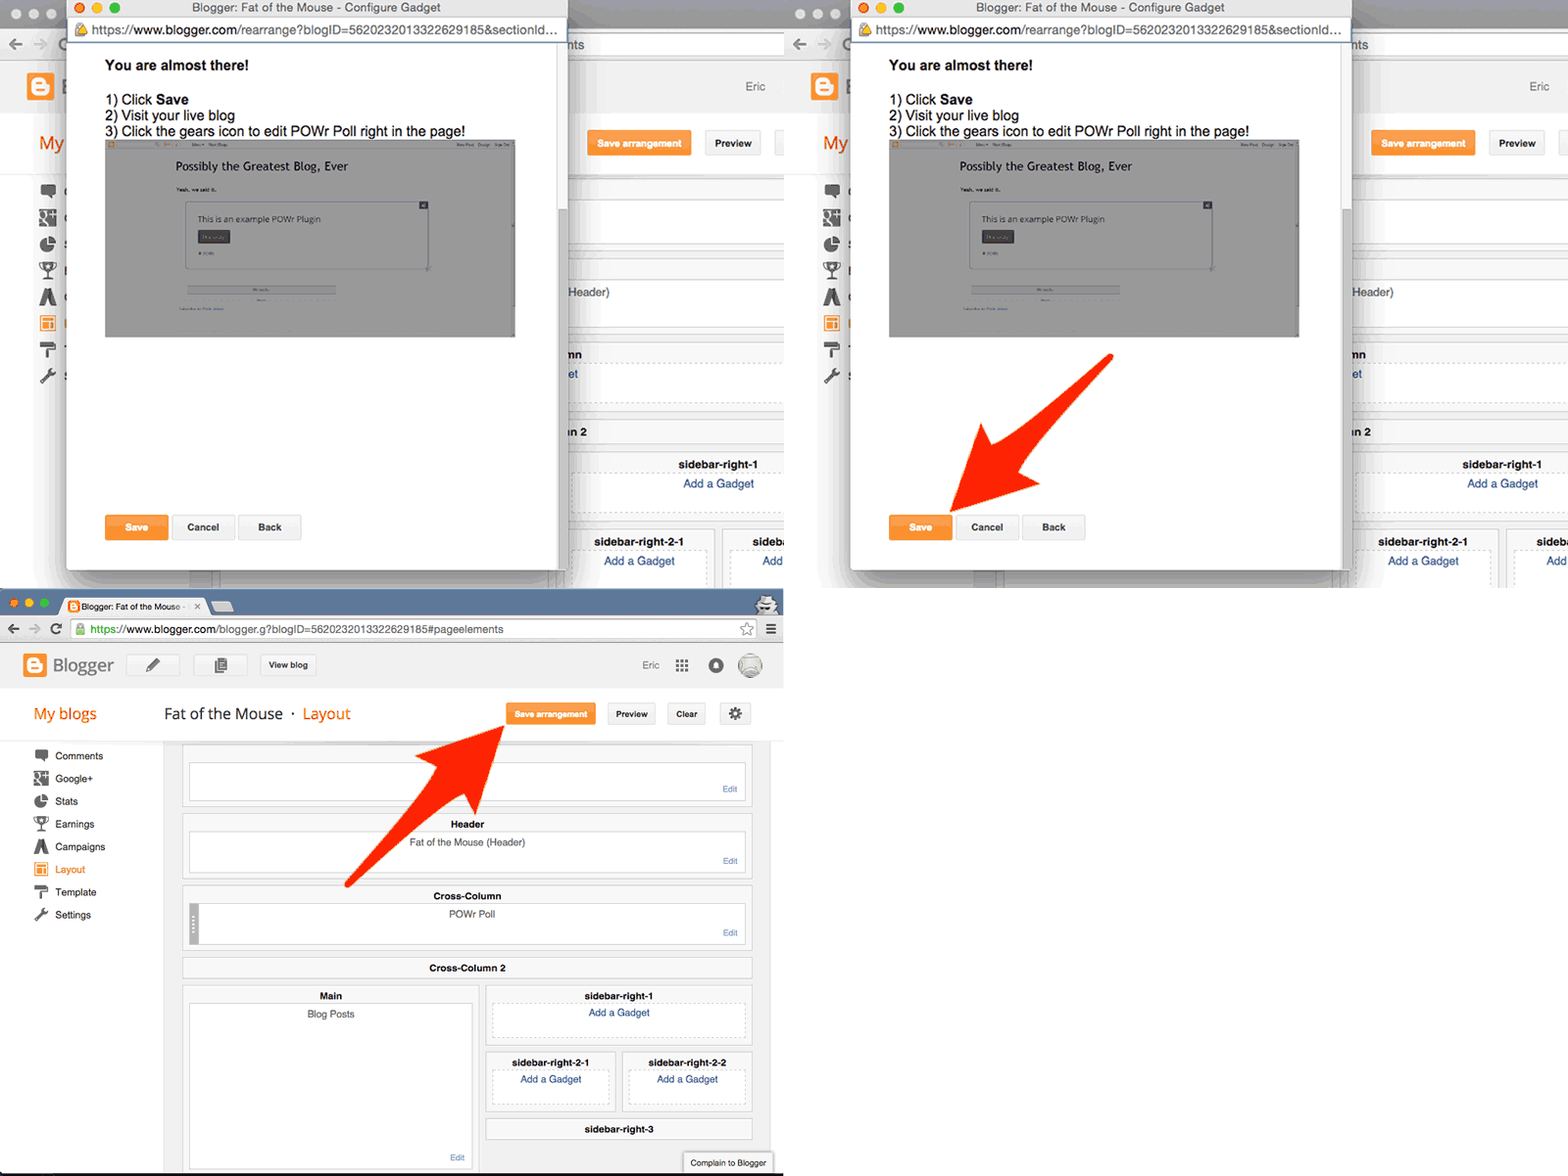
    Blogger Weather Step 41

    Save Arrangment

    The new POWr Weather gadget will appear in the Layout. 

    Save Arrangement then View Blog.
  • STEP
    6
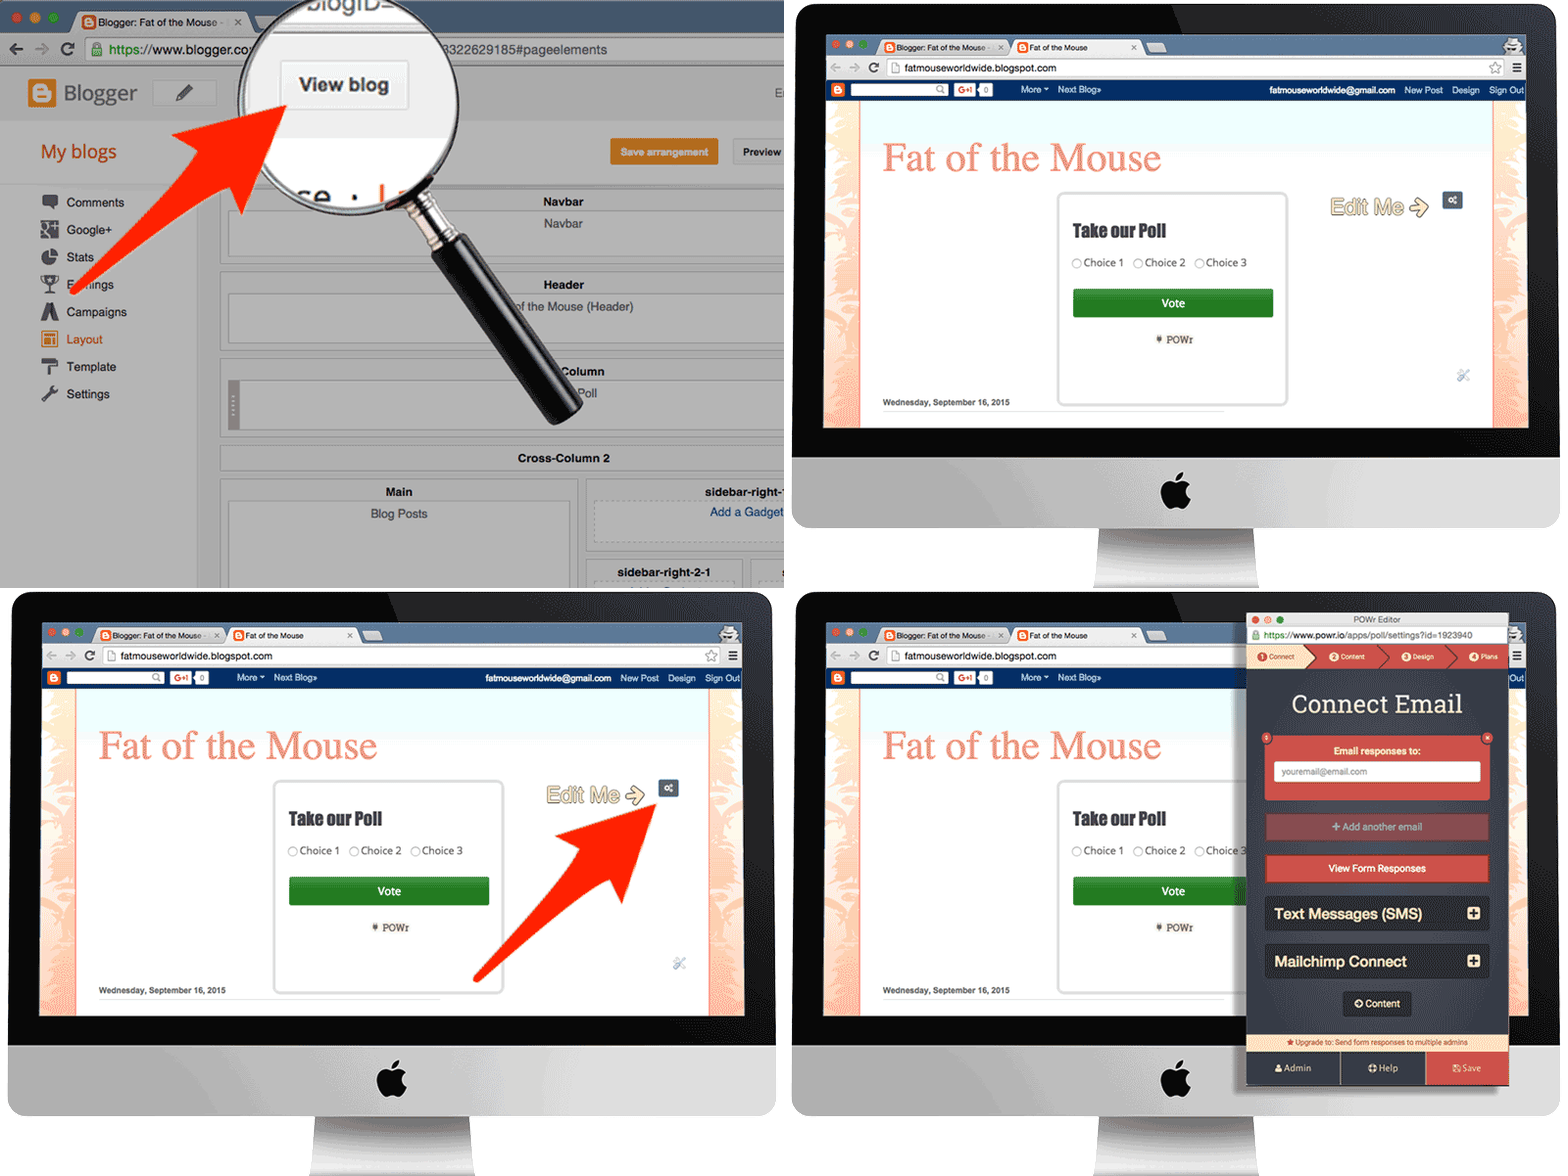
    Blogger Weather Step 51

    View Blog to customize POWr Weather

    Click on View Blog to visit the live, published Blogger site. 
    Find the new Weather Widget. You will see a blinking Edit Me sign, pointing to a Settings Icon. 
    Click the Settings Icon to launch the POWr Editor and begin editing your Weather Widget. 

    In the POW Editor, go to Admin  Import. FindWeather-bf739a95_1460264207357 and clickSync. The correct Weather will appear.

    How to add Weather Widget in blog


The following tutorial will add POWr Weather as a Widget to the Blogger website Layout

Contact us

Name

Email *

Message *

Follow us on FB

Blogger news

More custom template flexibilityLast May, we added some expressions to our templating language to make it easier for you to customize your blog’s look and feel. These new expressions proved popular with those of you who enjoy advanced blogging tools, so we wanted to offer you even more flexibility. Starting today, we’re introducing a new set of operators, which we’re calling lambda expressions...